Thursday, October 4, 2012

Metal master Cylinder Caps

I've developed a small obsession with the metal master cylinder caps that were used on the earliest Minis up until about mid-1961, when they were replaced with plastic caps. The plastic caps are much more sensible. They don't rust, they don't seize on and they have nice big finger grips to undo them BUT the metal caps are a unique feature of the first Minis and are one of those important details in a restoration.

The original caps. The least worst one
 has had its pinholes soldered up
The metal caps were never any good and almost invariably end up being damaged by people trying to undo them after they seize on. Typically, they look like the two that were on my Traveller when I got it. The one on the left has been repaired so that I could re-use it, but the one on the right  is falling apart and couldn't be re-used. I managed to find one good one on ebay for a price I could live with, but many of them have been selling for such vast sums that I've just stopped bidding on them. The problem is not helped by them having been used on a number of similar aged cars, especially MGs. At the prices that they have been selling for most people just use the plastic caps, although I did once own a Mini that had been fitted with a lid off a sauce bottle.

When I discovered a couple on ebay recently that looked to be in perfect condition and reasonably priced I got a bit excited and read a bit further. They turned out to be reproductions. I did a bit of googling and sent off an email to Scarborough Faire, an MGA specialist in the US. Sure enough they have had them reproduce, apparently in the UK too. Price $7.95, which was well below the ebay price, even of the replicas. Freight from the US is typically the most expensive part, so I ordered enough caps for this project and the next one (not sure what it will be yet) and they arrived today costing just on $10 each, landed.
The new repro beside my one good original cap. Pretty bloody close!

 Looking at them closely, they are very good. They have a couple of minute differences, but are way better than the plastic alternative. The inside is pretty well identical too, and they come with a sealing gasket.

Repro cap on the left, genuine on the right.
Once fitted you'd have to stick your head right into the engine bay to notice the difference, apart from being a  bit more brightly plated than the originals.

You'd have to be pretty happy with that!


A bit more investigative web surfing suggests that the caps are being made by a company in the UK called TRW who make a lot of brake components and aftermarket automotive parts.

Thursday, August 2, 2012

Interior Trim


Vinyl swatches from 1961 - Spanish Red and Grey Fleck.
The red is quite a lot darker in real life

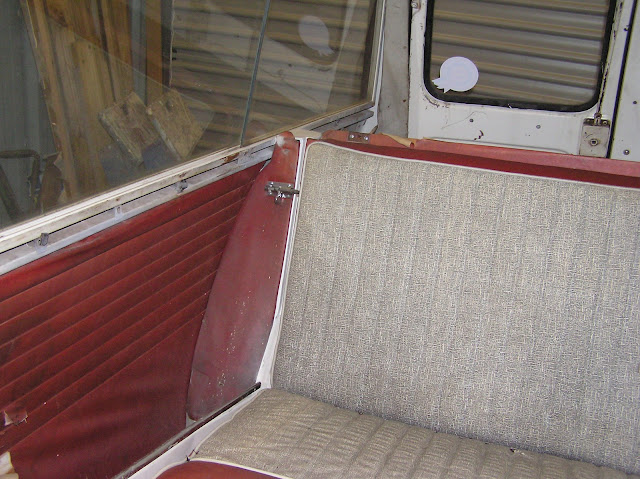
A few bits of trim missing
At this early stage worrying about interior trim seems a bit premature, but with plans of registering and running the car before finishing the restoration, I'll need to get the trim sorted out soon. The problem is that quite a bit of the original trim is missing, and with very few Travellers or even early English Mini sedans in Australia, its going to take a bit of sorting out. Its not helped by some of the contradictory information published on some of the better known websites. I can be pretty certain about the trim that is present in the car, but there are still a few gaps. The "Colour Finishes and Upholsteries" brochure from 1961 shows clearly the grey fleck and Spanish red used on the seat covers, but doesn't supply any of the minor details or say anything about the other trim apart from saying that the carpet is red. Luckily My seats are still there and although the bases have been re-covered I can tell that they have welded rather than stitched flutes, the flutes are narrow and the seats have white rather than red piping. In a sedan these would be regarded as Austin seats, but I suspect they are really Longbridge seats.
The door cards are missing, but I can tell from the rear quarter panel cards that they would have been Spanish red with welded flutes.

Grey headlining material
The headlining and most of the minor trim is light grey headlining vinyl which is embossed with a sort of square weave pattern. Interestingly this material is still available. It must have been very widely used on British cars as I've found it listed as being for Minis, Morris Minors and MGs with various suppliers. This material is used on most of the small sections of trim around the rear windows and rear doors and on the dash board either side of the speedo. It is quite stained on the headlining and dirty everywhere else, but I scrubbed a bit of it with a nailbrush and hand cleaner and it came up really well. Some of it will need to be replaced, but a lot of it I should be able to reuse.

What should the dash shelf be lined with?

One area I really don't know about is the lining on the shelf of the dashboard. Its missing, which is no help. I've read that it should be the same colour as the door trims (red), match the panels either side of the speedo (grey headlining) or be black hardura, a kind of coarse grained stiff vinyl on a fibre felt backing.

In the load bay at the back most of the trim is missing. There are a couple of bits of the grey headlining stuff, that I'll be able to uses as patterns but the rest is pretty poor. The panelling in the side walls (also around the sides and across the back of the folding rear seat) is flat unfluted Spanish red. Unfortunately the very important tank cover is missing. I guess that it was made of the same material as the dash panel lining, a kind of thick black cardboard, but covered in the flat Spanish red material. Unfortunately I've only been able to find some dodgy photos of one or two and really don't have much detail about the shape or construction of the cover.

Flat red vinyl in the load bay
The final trim question is carpet. the Traveller came with a set, but I'm pretty sure its not original and came out of something else. The rear seat back has been covered in white shaggy wool carpet which looks pretty terrible.

So all in all there's a bit to do. the seat covers have been extensively repaired in the front and really need replacing. the rear seat is OK but the red part of the base has a big tear in it. I can source repro trim from Newton Commercial in the UK, but the reports are that its good, but not great. Its also quite expensive. so I'm in a bit of a quandary. I've requested some
swatches of repro material from Newton's and a Traveller price list and catalog so I'll see what I'm up for and make a decision.

Monday, July 16, 2012

Early Mk1 Morris Mini Traveller for Sale in Australia

A modern day 'barn find'
I was really surprised when another early internal tanked Traveller cropped up on the Ausmini forum last week. The rumours always said that there were more early woodies here, but its nice to get some confirmation. With mine and Garry's in Albury-Wodonga this makes three. This one is in Adelaide and is almost identical to mine. The chassis and FE number are about 1000 later, but the engine number is about 1000 earlier. So the two are almost twins. I've been in touch with the owner and in another coincidence, he's a Tim too. Spooky!

I've been watching with interest as he tries to work out exactly when it was built, from the numbers I'd guess a couple of weeks after mine, so early February 1961. I'm really curious as to where it was despatched after manufacture. I'd love to learn that it went to Derbyshire Motors with mine.
The trim is a bit tatty, especially the seats, but at least
its mostly all there. Its a lot more complete than mine.

Due to his personal circumstances Tim reluctantly has it up for sale, and to me it looks like a great project. Importantly the body is relatively rust free. One door is a perforated and the guttering on one side looks a bit crusty, but the floors look really good. I doubt any panels would need to be replaced (apart from that door). It has lost its engine, but that might be a good excuse to hot it up a bit and the interior and woodwork are a bit scruffy so it looks like the new buyer will be spending some cash with Newton Commercial and one of the Traveller timber suppliers.

There are heaps more photos on Tim's blog.
The all important internal tank - car could do with a clean

So if you fancy a Mini project that is a bit special, get on to Tim through the Ausmini link, or his blog and make him an offer. He has to move it soon so in real estate terms he's a 'motivated vendor'.


Tuesday, February 21, 2012

Engine Stripdown Progress

I've been making slow but steady progress with stripping the power unit. Its mostly coming apart fairly easily, the fasteners are generally in good condition and most of it looks not to have been abused too heavily. The last time I pulled down an unknown engine just about every part of it was either badly worn, or had been damaged by a ham-fisted amateur who should have left it alone.

The head came off relatively easily although there was a bit of corrosion around the studs which held it pretty tight. Its a bit odd though, it doesn't seem to match the rest of the engine. It has no green paint on it at all, it appears to have been painted in red oxide. It also shows some marks that appear to have been caused by abuse, and the valve stems look very worn. Examination of the casting numbers just furthers the mystery. No-one on any of the forums I've contacted can identify the head. The best guess is Morris Minor or Austin A30. It doesn't really matter, it looks exactly the same as an 850 head, so for the time being I'll do it up to go back on. I'm actually considering something a bit more special for the head down the track.

Morris Minor or Austin A30 or A35?


Who or what were BRITMO?
What does 2A3 AF2 AS3 mean?


I was very careful removing the timing gears, I'm well aware that the sides of the cam timing wheel are brittle and can easily be broken if removed carelessly. Once I'd removed it I discovered that it had been damaged and repaired in the past. Oh well, I thought, and went to find another in my spares pile. While washing the spare one, the side cracked out of it too, it must have been damaged when it was removed many years ago (what was I saying about ham fisted amateurs?). Now I'll need to find a replacement, but the good ones with the rubber chain tensioner rings are no longer available.

The original timing gear, that's what happens
when you lever them off with a screwdriver
My only spare timing gear, the
crack was invisible until I washed it


Saturday, January 14, 2012

Replacement Engine Found

Following from a lead at MiniFest back in November I collected a replacement power unit today. Neither the current engine or gearbox belong to the Traveller. The old engine is a 998cc from an Australian Deluxe, fitted to a gearbox from a later 850. The new engine would have originally been fitted to an Australian assembled (CKD)  Morris 850. It has the same 8AM-U-H engine number prefix as the original, and I believe the casting numbers (and hence the casting) are correct. Advice from the Early Mini Forum suggests that it dates from around January 1962, so is only 12 months younger than the Traveller, which makes it very close in style to the original one, having the same small tail crank, spring clutch and cone synchromesh. None of these features are actually very good, hence they were all phased out and improved soon after.

I believe that these are the same casting numbers
 that the Traveller would have had originally.
22A363 indicates a late cone synchro gearbox, phased out in 1962
I pulled the head off in a brief spare moment today and it looks a bit sooty inside, but it doesn't seem to have a noticeable ridge in the cylinder wall and seems to be on the standard bore, which is quite remarkable considering its 50 years old and an 850.

One nice thing is that this engine has a lot of the original bracketry and hardware missing from the other one, but I have all of the major parts that this one is missing.

I'm extremely grateful to Don C., who sold me the engine for a very reasonable price, largely because he appreciates the Traveller and what I'm trying to do with it. The engine was stored at Don's friend Rod's place, where I was treated to a display of several very nice Minis in a range of styles and colours, but all in excellent condition, plus a yard full of "spares" in varying states of saveability. Rod is a very friendly bloke, who obviously loves his Minis, so it was a pleasure to spend some time chatting after he'd helped me load the engine. Rod was quite happy for a complete stranger to drive off with his mate's engine without paying for it. I'll fix Don up next week. Its great to have met two excellent Mini men who want to share their passion and help out others, without first thinking of the profit line. I hope to be able to pay the favour forward.

Having this engine means that I can start the next stage of the restoration. Because I have so little spare time I'm reluctant to fly into stripping down the Traveller, in case I get stuck and have to leave it pulled apart forever. This engine is a bite-sized chunk I can be going on with while leaving the car intact.