Friday, April 20, 2018

Rear Seat Belts in Mini Estates

What to do about rear seatbelts? In the UK, car manufacturers weren't required to fit rear seatbelts until 1986.  Sadly manufacture of all estate variants ended in 1980, so the UK factory never needed to solve the problem for us.

Lap belt catch mounted through wheel arch.
Lap belts in a Clubman Estate
Its not too hard to retro-fit lap seat belts. Most jurisdictions allow a metal spreader plate fitted with a standard 7/16 UNF captive nut to be used under the floor, or in the wheel arch. To anchor the two ends of the belts. Here are some pictures I stole from the old Clubman Estate Register forum.

The wheel arch is structurally strong, but too low to mount a shoulder sash
Also the fuel tank  is right there in my Traveller.
The bigger challenge is if you want a lap/sash belt. Lap/ sash belts are far safer, something I learned in my short career as a Mini Moke crash test dummy. The problem in the back of a Traveller is the lack of places to solidly attach the shoulder strap. The attachment point needs to be structurally solid and at the correct height relative to the passenger's shoulders.  Pictured here is another example of a Clubman Estate, this one fitted with a sash belt. In my opinion this belt is mounted much too low to be safe. When an adult is seated in the back seat their shoulder will be several inches higher than the seatback. In a collision, the belt will pull down and loosen. Its difficult to find any hard data on the correct height but generally between 4 inches below shoulder height to level with shoulder height seems to be accepted.

Here are two more examples. Both have the reel mounted at a better height. However I have serious doubts about the strength of that section of the seat rest that these are attached to. The red one seems to be reasonably well reinforced, as well as being a few inches higher, but the black one is ugly and the bar which runs right across to the other side will obstruct the load area when the seat is folded down.


As mentioned previously the UK factory never needed to solve the problem, but the Australian factory did. The Australian factory never put an estate version into production, but they did experiment with a couple of prototypes. The green clubman estate in these photos was one of apparently two prototypes developed in the mid '80s as an experiment. Unfortunately the only pictures I have were taken from a gumtree ad when the one survivor was sold a few years back. There are a couple more photos in "The Mini Experience"magazine, but they are under copyright.
These pictures show that the the shoulder sash is attached in the rear corners of the roof, each side of the doors. There is a rigid 'droplink' mounted to the body above the side windows at the top and in the seat rest at the bottom. The droplink has a smooth loop that the seatbelt passes through. These keep the sash at a good shoulder height.


On the face of it this looks like a good solution. I imagine that a metal bracket must be welded into the upper rear corners of the body to provide a mounting point, but that wpuld be a very strong part of the body. The droplinks have comparatively little force on them becasue the belt just slides through, so they should be more than strong enough.

If I was going to fit lap sash belts, I think that's what I'd work toward. The mounting points should be able to be hidden under the trim in those areas comparatively easily. Choosing belts that complement the trim (not dirty black and flouro orange) would help.

Tuesday, September 19, 2017

Speedometer and Speedo Cowl


The early Minis were fitted with a speedometer cowl made of compressed cardboard. When I got the Traveller it was fitted with a plastic cowl from a later model. Very few Australian minis had the cardboard ones, so I had to get one from overseas. Eventually I sourced one from the USA - postage was horrendous, for a bit of cardboard. It was pretty tatty when it arrived (see the 'before' picture below). Painted black, and with several of the mounting holes torn out. But at least it wasn't water damaged or distorted.

I did some research to try to work out what these cowls were really made out of. Its not really cardboard or paper mache in texture, its much harder and smooth on the outside like MDF. On the inside it has the texture of the wire mesh mould that it was pressed into. It is some kind of thermoformed fibre. Pulp is pressed into a mould and heated. Apparently its a very old process that has been around since 1898. Waste paper or wood pulp could have been used.
The 'before' photo

I patched the holes with paper gauze and glue and repaired it. Then I rubbed it down by hand (it is too fragile to machine sand) prepped it and painted it. The painting did not go well. I don't know what it was originally painted with, but each time I applied topcoat it would react with the layers beneath and "fry up". It happened three times, with hours of hand sanding to take it all back off after each attempt.

Finally it came out looking pretty good. In fact now its so good, it looks like a plastic one. Oh well at least I know its compressed cardboard.

All the hand sanding each time was very disheartening and it took me the better part of 8 months to complete the job.


SN4410/00 Early Morris Speedo with Five Digit Odometer.
Back from Howard's it looks great!
There were two versions of the silver faced Smith's speedometer used in early 850s. The first one (SN4410/00) had a 5 digit odometer. This was replaced later with a SN4480/00, which looked almost identical, but had a 6 digit odometer with an orange 10ths of Mile digit on the odometer. Of course mine was the wrong one. I hunted for ages to find a reasonable early one with a clean face and a good transparent needle. In the end I sourced one from the UK. It was pretty rusty and looked like it had been sitting around for a long time. I thoroughly cleaned it and derusted the rear casing and with a little mixing and matching of parts sent it off to Roger Howard at Howard Instruments for a rebuild. Its looking pretty good now!

The rear of the speedo. 


I'm told that Mr Howard senior, did the work. He has been servicing Mini speedos since the days of doing them under the factory warranty. The speedo and odometer mechanism have been repaired and serviced and the face has had a clean. The previously rusty rear of the body has been replated and a new chrome bezel fitted. They also rebuilt the fuel gauge and replated its casing. They have gone to the trouble of plating the speedo body in silver with the back of the fuel gauge in gold passivation. This is how they were done from new. It looks absolutely superb, but with a tiny bit of wear on the face and just a little fading on the needle, to give it some patina. Best of all it should work at least as well as the day it was made - but probably better, the early ones didn't have a good reputation!

Now to get it all back into the car.


Tuesday, February 25, 2014

Some Nice Bits

I started off by trying to clean up the interior trim, and it just kind of snowballed. The wiring loom needed to be replaced, the fuel tank had to come out and then I discovered that the fuel tank sender unit was burnt out.

The old wiring loom had faded very badly and the cotton braiding had lost almost all of its colour coding, it also had a few nasty amateur repairs, so it had to go. After a bit of discussion on the Early Mini Forum I contacted Autosparks in the UK for a new loom. There was a bit of mucking around (partly my fault for not stressing that this was a rare internal tanked Traveller) but I now have a lovely looking bespoke wiring loom.


I'm really pleased with the cotton braiding of the loom. The main loom is black with a yellow fleck and the rear loom is black with two blue flecks. This seems to have been standard for Travellers, I think the blue fleck is a kind of colour coding to make it clear that the rear loom is a Traveller one. The sedans had a yellow fleck at the back.

I'm not quite ready to re-fit it yet but I'm looking forward to it. It will be nice to fit a flexible new wiring loom with clear colour coding.

BEFORE: The charred resistance coil. It can't be a good thing
for something submerged in petrol to be getting that hot!
The fuel sender unit is also looking pretty good too. When I tested it with a multimeter it was open circuit inside, so I carefully opened it to see if there was anything I could repair - not a hope. The resistance coil was badly burnt and I don't have the patience to try to repair it.So I sent it off to Roger Howard at Howard Instruments. Roger specialises in Smiths instruments (amongst many others) and collects old Minis - the ideal combination!

The sender has come back with a new 80 ohm resistor coil (even the phenolic core of the coil was charred) and the outer plate has been re-plated, just as it would have been when first fitted. Its ready to do another 50 years now! I think Roger might have looked after me a little bit price-wise too. His price was very reasonable, for the work he's done.

AFTER: the original gauge, now looking as good as it would have in 1961.
I'm so glad that there are businesses like Austosparks and Howard Instruments that can take the time to repair or re-manufacture parts like these. For most modern cars you wouldn't bother, just chuck it and use a modern replacement.

Wednesday, November 6, 2013

Traveller Jack and Toolkit

The toolkit from the early Traveller parts manual (AKD3411)
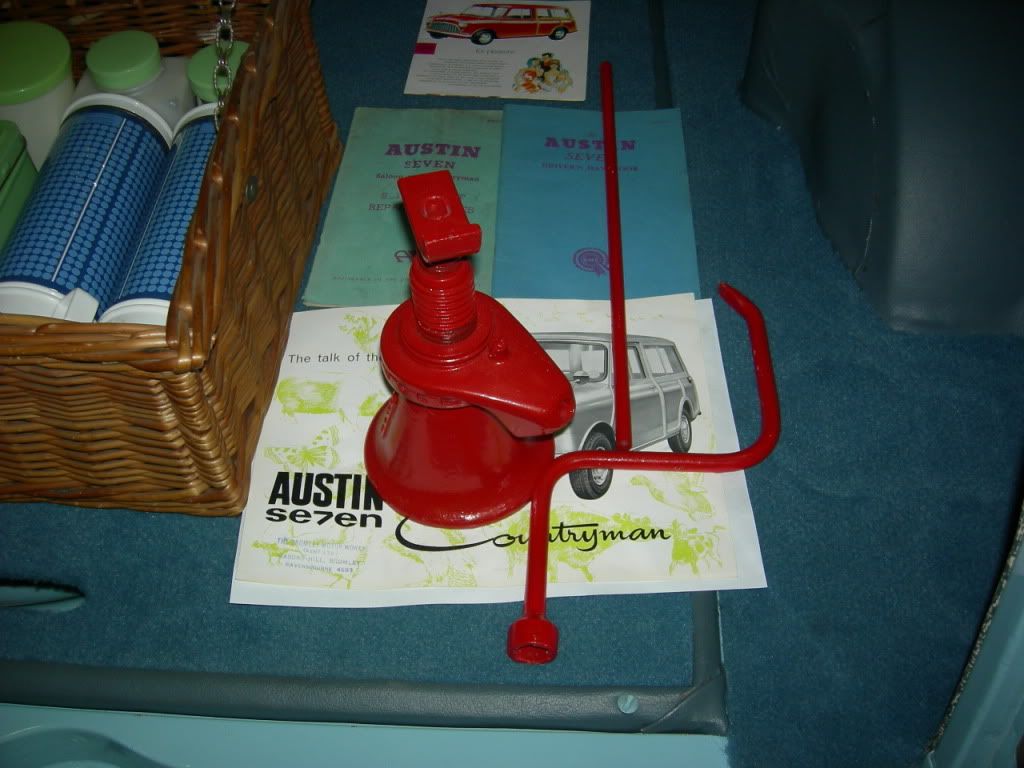
Like a lot of small bits and pieces, the jack and tool kit is missing from my Traveller. It would be nice to be able to replace it with a reasonable facsimile of the original kit. According to my early Traveller parts manual, the standard tool kit supplied with the vehicle is pretty basic. A jack and jack handle, a cranked wheel nut brace which also doubles as a tool to damage the hubcap, a spark plug tube spanner with its tommy bar and a levelling bracket that fitted on top of the jack when jacking the front of the car. A bag (for the smaller parts) was also supplied.
The smaller tools should be pretty easy to replace, the dodgy wheel brace was used on Mini sedans, and the tube spanner and tommy bar will be common to many BMC cars of the period. Replica bags are available from places like Newton Commercial and some other specialists. Which just leaves the jack as the most difficult item to source.

The jack of an Austin Seven Countryman. I think this is in Richard Mortlock's
car, which is a week older than mine. (photo: Bill Bell) 
The tricky part is working out which jack is correct. The parts manual can't be relied on - often they would borrow illustrations they already had from other manuals - or just use a generic drawing of the object. In this case it does look like it should be a screw type jack, and with the help of the British Car Jack Database it looks like the Shelley LJ225 which was supplied with some Austin Healeys. Bill Bell from the 1959 Mini Register supplied me with this picture. It shows the jack in the rear of an early Countryman (so an Austin, not a Morris like mine). Again with the help of the British Car Jack Database, this appears to be a different version of the Shelley LJ225 - for Minis so it looks like it is correct, and probably should be the one I'm looking for. These jacks were never supplied with Australian Minis, so I'll have to get one from the UK.

A metallifacture jack in an April 1961 Morris Mini Traveller
(Photo: Sussex Sports Cars)
Just to throw a spanner in the works, I came across this picture. It is 'borrowed' from the website of Sussex Sports Cars where this 1961 Morris Mini Traveller is for sale. It shows a completely different style of jack made by Metallifacture in the UK.This is the type of jack that we refer to as a Mini van jack, in Australia, but I have seen them listed as Mini Estate jacks on ebay in the UK.  The British car Jack database also lists Metallifacture jacks for Minis, and suggests that they were supplied from 1962-1968 - however it doesn't claim to be encyclopaedic. This Traveller is approximately three months younger than mine.

So the question is, which jack is correct? Either or both cars could have lost their original jack during the past 52 years. Maybe both jacks were supplied with 1961 Travellers - which would be nice, because I already have a Metallifacture jack that I managed to source a few years ago.

Just a final note. BMC offered tool kits as an extra accessory. These were much more comprehensive and contained a range of additional tools including spanners, pliers and screwdrivers. Luckily there is also a small number of unique individuals who spend their time tracking down the minutiae of BMC tool kits, so I hope to be able to source the bits to put together the extra items needed for one of them too.

Friday, June 28, 2013

Press Photos (1)

I have a small collection of original BMC press photos, from the heyday of the Traveller and Countryman. These photos were produced by BMC and were sent out to the press to be used to illustrate press releases and articles. Sometimes they have the typed press release on the back of the photo.  Some just show a plain photo of the vehicle, and I suspect these were often a bit of a rush job to get a picture out there, whereas others are more artfully composed and often show the vehicles in an interesting setting and accompanied by glamorous models. Most of the photos are in black and white but sometimes they are in colour.

At present the I only have two prints of early internal tanked cars. There are others available but I haven't found any that are reasonably priced. This picture shows an early Austin Se7en Countryman. You can tell from the picture that it is a light colour and its not white, so it must be speedwell blue. Actually I know it is because this is one of a sequence of pictures taken at the same time, some of the others show a young family in and around the car and at least one of them is in colour.

The picture below is nice ans shows a tartan red Countryman being loaded by young woman while her husband, helpfully watches on. Of interest are the bags that are being loaded. They look like they could be the bags offered as accessories by BMC in the early sixties. The basket in particular looks like the style that were designed to fit into the side storage bins in the back seat. Identical repro baskets are available from the 1959 Mini register.


Although its not possible to clearly read the registration number of each car, they both seem to have the UK 3 letter and 3 number type which were used up until August 1962. Both cars are internal tanked, built earlier than October 1961, so the pictures must date from around 1960 or '61.

Thursday, October 4, 2012

Metal master Cylinder Caps

I've developed a small obsession with the metal master cylinder caps that were used on the earliest Minis up until about mid-1961, when they were replaced with plastic caps. The plastic caps are much more sensible. They don't rust, they don't seize on and they have nice big finger grips to undo them BUT the metal caps are a unique feature of the first Minis and are one of those important details in a restoration.

The original caps. The least worst one
 has had its pinholes soldered up
The metal caps were never any good and almost invariably end up being damaged by people trying to undo them after they seize on. Typically, they look like the two that were on my Traveller when I got it. The one on the left has been repaired so that I could re-use it, but the one on the right  is falling apart and couldn't be re-used. I managed to find one good one on ebay for a price I could live with, but many of them have been selling for such vast sums that I've just stopped bidding on them. The problem is not helped by them having been used on a number of similar aged cars, especially MGs. At the prices that they have been selling for most people just use the plastic caps, although I did once own a Mini that had been fitted with a lid off a sauce bottle.

When I discovered a couple on ebay recently that looked to be in perfect condition and reasonably priced I got a bit excited and read a bit further. They turned out to be reproductions. I did a bit of googling and sent off an email to Scarborough Faire, an MGA specialist in the US. Sure enough they have had them reproduce, apparently in the UK too. Price $7.95, which was well below the ebay price, even of the replicas. Freight from the US is typically the most expensive part, so I ordered enough caps for this project and the next one (not sure what it will be yet) and they arrived today costing just on $10 each, landed.
The new repro beside my one good original cap. Pretty bloody close!

 Looking at them closely, they are very good. They have a couple of minute differences, but are way better than the plastic alternative. The inside is pretty well identical too, and they come with a sealing gasket.

Repro cap on the left, genuine on the right.
Once fitted you'd have to stick your head right into the engine bay to notice the difference, apart from being a  bit more brightly plated than the originals.

You'd have to be pretty happy with that!


A bit more investigative web surfing suggests that the caps are being made by a company in the UK called TRW who make a lot of brake components and aftermarket automotive parts.

Thursday, August 2, 2012

Interior Trim


Vinyl swatches from 1961 - Spanish Red and Grey Fleck.
The red is quite a lot darker in real life

A few bits of trim missing
At this early stage worrying about interior trim seems a bit premature, but with plans of registering and running the car before finishing the restoration, I'll need to get the trim sorted out soon. The problem is that quite a bit of the original trim is missing, and with very few Travellers or even early English Mini sedans in Australia, its going to take a bit of sorting out. Its not helped by some of the contradictory information published on some of the better known websites. I can be pretty certain about the trim that is present in the car, but there are still a few gaps. The "Colour Finishes and Upholsteries" brochure from 1961 shows clearly the grey fleck and Spanish red used on the seat covers, but doesn't supply any of the minor details or say anything about the other trim apart from saying that the carpet is red. Luckily My seats are still there and although the bases have been re-covered I can tell that they have welded rather than stitched flutes, the flutes are narrow and the seats have white rather than red piping. In a sedan these would be regarded as Austin seats, but I suspect they are really Longbridge seats.
The door cards are missing, but I can tell from the rear quarter panel cards that they would have been Spanish red with welded flutes.

Grey headlining material
The headlining and most of the minor trim is light grey headlining vinyl which is embossed with a sort of square weave pattern. Interestingly this material is still available. It must have been very widely used on British cars as I've found it listed as being for Minis, Morris Minors and MGs with various suppliers. This material is used on most of the small sections of trim around the rear windows and rear doors and on the dash board either side of the speedo. It is quite stained on the headlining and dirty everywhere else, but I scrubbed a bit of it with a nailbrush and hand cleaner and it came up really well. Some of it will need to be replaced, but a lot of it I should be able to reuse.

What should the dash shelf be lined with?

One area I really don't know about is the lining on the shelf of the dashboard. Its missing, which is no help. I've read that it should be the same colour as the door trims (red), match the panels either side of the speedo (grey headlining) or be black hardura, a kind of coarse grained stiff vinyl on a fibre felt backing.

In the load bay at the back most of the trim is missing. There are a couple of bits of the grey headlining stuff, that I'll be able to uses as patterns but the rest is pretty poor. The panelling in the side walls (also around the sides and across the back of the folding rear seat) is flat unfluted Spanish red. Unfortunately the very important tank cover is missing. I guess that it was made of the same material as the dash panel lining, a kind of thick black cardboard, but covered in the flat Spanish red material. Unfortunately I've only been able to find some dodgy photos of one or two and really don't have much detail about the shape or construction of the cover.

Flat red vinyl in the load bay
The final trim question is carpet. the Traveller came with a set, but I'm pretty sure its not original and came out of something else. The rear seat back has been covered in white shaggy wool carpet which looks pretty terrible.

So all in all there's a bit to do. the seat covers have been extensively repaired in the front and really need replacing. the rear seat is OK but the red part of the base has a big tear in it. I can source repro trim from Newton Commercial in the UK, but the reports are that its good, but not great. Its also quite expensive. so I'm in a bit of a quandary. I've requested some
swatches of repro material from Newton's and a Traveller price list and catalog so I'll see what I'm up for and make a decision.

Monday, July 16, 2012

Early Mk1 Morris Mini Traveller for Sale in Australia

A modern day 'barn find'
I was really surprised when another early internal tanked Traveller cropped up on the Ausmini forum last week. The rumours always said that there were more early woodies here, but its nice to get some confirmation. With mine and Garry's in Albury-Wodonga this makes three. This one is in Adelaide and is almost identical to mine. The chassis and FE number are about 1000 later, but the engine number is about 1000 earlier. So the two are almost twins. I've been in touch with the owner and in another coincidence, he's a Tim too. Spooky!

I've been watching with interest as he tries to work out exactly when it was built, from the numbers I'd guess a couple of weeks after mine, so early February 1961. I'm really curious as to where it was despatched after manufacture. I'd love to learn that it went to Derbyshire Motors with mine.
The trim is a bit tatty, especially the seats, but at least
its mostly all there. Its a lot more complete than mine.

Due to his personal circumstances Tim reluctantly has it up for sale, and to me it looks like a great project. Importantly the body is relatively rust free. One door is a perforated and the guttering on one side looks a bit crusty, but the floors look really good. I doubt any panels would need to be replaced (apart from that door). It has lost its engine, but that might be a good excuse to hot it up a bit and the interior and woodwork are a bit scruffy so it looks like the new buyer will be spending some cash with Newton Commercial and one of the Traveller timber suppliers.

There are heaps more photos on Tim's blog.
The all important internal tank - car could do with a clean

So if you fancy a Mini project that is a bit special, get on to Tim through the Ausmini link, or his blog and make him an offer. He has to move it soon so in real estate terms he's a 'motivated vendor'.


Tuesday, February 21, 2012

Engine Stripdown Progress

I've been making slow but steady progress with stripping the power unit. Its mostly coming apart fairly easily, the fasteners are generally in good condition and most of it looks not to have been abused too heavily. The last time I pulled down an unknown engine just about every part of it was either badly worn, or had been damaged by a ham-fisted amateur who should have left it alone.

The head came off relatively easily although there was a bit of corrosion around the studs which held it pretty tight. Its a bit odd though, it doesn't seem to match the rest of the engine. It has no green paint on it at all, it appears to have been painted in red oxide. It also shows some marks that appear to have been caused by abuse, and the valve stems look very worn. Examination of the casting numbers just furthers the mystery. No-one on any of the forums I've contacted can identify the head. The best guess is Morris Minor or Austin A30. It doesn't really matter, it looks exactly the same as an 850 head, so for the time being I'll do it up to go back on. I'm actually considering something a bit more special for the head down the track.

Morris Minor or Austin A30 or A35?


Who or what were BRITMO?
What does 2A3 AF2 AS3 mean?


I was very careful removing the timing gears, I'm well aware that the sides of the cam timing wheel are brittle and can easily be broken if removed carelessly. Once I'd removed it I discovered that it had been damaged and repaired in the past. Oh well, I thought, and went to find another in my spares pile. While washing the spare one, the side cracked out of it too, it must have been damaged when it was removed many years ago (what was I saying about ham fisted amateurs?). Now I'll need to find a replacement, but the good ones with the rubber chain tensioner rings are no longer available.

The original timing gear, that's what happens
when you lever them off with a screwdriver
My only spare timing gear, the
crack was invisible until I washed it


Saturday, January 14, 2012

Replacement Engine Found

Following from a lead at MiniFest back in November I collected a replacement power unit today. Neither the current engine or gearbox belong to the Traveller. The old engine is a 998cc from an Australian Deluxe, fitted to a gearbox from a later 850. The new engine would have originally been fitted to an Australian assembled (CKD)  Morris 850. It has the same 8AM-U-H engine number prefix as the original, and I believe the casting numbers (and hence the casting) are correct. Advice from the Early Mini Forum suggests that it dates from around January 1962, so is only 12 months younger than the Traveller, which makes it very close in style to the original one, having the same small tail crank, spring clutch and cone synchromesh. None of these features are actually very good, hence they were all phased out and improved soon after.

I believe that these are the same casting numbers
 that the Traveller would have had originally.
22A363 indicates a late cone synchro gearbox, phased out in 1962
I pulled the head off in a brief spare moment today and it looks a bit sooty inside, but it doesn't seem to have a noticeable ridge in the cylinder wall and seems to be on the standard bore, which is quite remarkable considering its 50 years old and an 850.

One nice thing is that this engine has a lot of the original bracketry and hardware missing from the other one, but I have all of the major parts that this one is missing.

I'm extremely grateful to Don C., who sold me the engine for a very reasonable price, largely because he appreciates the Traveller and what I'm trying to do with it. The engine was stored at Don's friend Rod's place, where I was treated to a display of several very nice Minis in a range of styles and colours, but all in excellent condition, plus a yard full of "spares" in varying states of saveability. Rod is a very friendly bloke, who obviously loves his Minis, so it was a pleasure to spend some time chatting after he'd helped me load the engine. Rod was quite happy for a complete stranger to drive off with his mate's engine without paying for it. I'll fix Don up next week. Its great to have met two excellent Mini men who want to share their passion and help out others, without first thinking of the profit line. I hope to be able to pay the favour forward.

Having this engine means that I can start the next stage of the restoration. Because I have so little spare time I'm reluctant to fly into stripping down the Traveller, in case I get stuck and have to leave it pulled apart forever. This engine is a bite-sized chunk I can be going on with while leaving the car intact.

Monday, November 7, 2011

Media Coverage

At MiniFest yesterday, I was summoned to the Traveller by a call over the PA. It was for a brief interview with a local journalist and to pose for a photo. Neither are something that I relish, but I did what I was told. There was quite a big article about MiniFest in the paper today, and on "The Mercury's" website. I think the photographer captured the Traveller's good side. Click on the image to see the full article.

I should say that I don't always wear loud shirts, but that's my Moke Californian shirt, custom made by the Moke Owners Association of Victoria. I only get it out on special occasions. The orange T-shirt is from Dean Wilhite's Dooderwear in the U.S. I have one of his Moke design and a Woody one. Click the buttons below to see the full design.


Sunday, November 6, 2011

A Grand Day Out


The Traveller holding Sarah's baloon
 I'm pleased to report that the Traveller behaved perfectly for the trip to MiniFest 2011. Barry, my father-in-law, followed me in my Moke as moral support and emergency tow vehicle. But it wasn't needed. The engine ran even better today, and giving it a run seemed to clear some of the cobwebs out. It was haemorrhaging oil, the exhaust was blowing and there's a lot of interior trim missing so it was noisier than it should have been, but I had a beaming smile as I drove it in. There are a few hills and a steep climb over the bridge, and it did get slowed down by them. I also realiased that I'd forgotten how to drive a 3 synchro gearbox, but they're minor issues.

This was the fifth MiniFest, the Mini Car Club of Tasmania organise the show at the same time every second year, and each time they seem to get bigger and better. The theme for the show is "Any Mini, any condition" but each show seems to have fewer rusty wrecks than the previous one, as they're replaced with shiny restored and original cars. My Traveller scrubbed up OK, but was still one of the worst looking. The paint is an old re-spray and is pretty poor, there are large areas that are flaking off and a lot of visible rust staining (although not much rust).

A nice early 850, in a traditional colour.
Its interesting to look at the cars and see how fashions have changed in restorations. A few years ago it was acceptable to paint Minis in lurid metallic colours, fit big wheels and do horrible things to the interior with weird choices in upholstery, but these days there are many more cars being repainted in their original colours and looking well kept rather than over restored. I like it that way.


The most Travellers ever seen together in Tasmania?
Two other Travellers attended, coincidentally both are green. The woody's owner recently moved to Tasmania from the ACT. It is nominally also a 1961 like mine, although there's precious little left from 1961. It has been re-shelled and fitted with the running gear from a late model injected Rover Cooper. The steel sided Traveller has been converted with all the running gear from an Australian 1275 LS, it seems pretty good mechanically, but I reckon that it really needs to be put right. James, the new owner agrees, but like me probably isn't in a position to rush it!


Mine's the orange one.
The day was unusually hot and being held in a large open area with no shade everyone got lightly toasted. It was great weather for Mokes and about 14 turned out. Barry didn't enjoy driving mine very much. The clutch is almost out of travel and he's not used to cars without power steering anymore.

The show ended with a ceremony to award a large number of trophies and I was pleased to be awarded "The car with the most potential". The guys presenting the trophies did wonder if this was a consolation prize.

MiniFest always ends with a cruise in convoy. In previous years it has been through the city, but this year was out of town on the highway. I'm not sure that it worked terribly well, and we all stopped in a very dubious location for a convoy photo, but it was still good fun. Barry and I took went in the moke, the Traveller's temporary permit didn't cover the convoy and it was further than I wanted to risk driving it.


A portion of the convoy at the photo stop. I was too lazy to walk to the front to try to get it all in.
 All in all it was a very successful event. I had a ball driving the Traveller and there was a lot of interest in it, I was photographed and interviewed by the local paper and I also got a couple of possible sources for a replacement 850 powerunit from the correct period.

Saturday, November 5, 2011

More Brake work and It Lives!


Look at that lovely stainless steel gleaming
I got the master cylinders and rear wheel cylinders back from being re-sleeved - the front wheel cylinders had been done previously. The quality of the work is excellent so they should be right to last another 50 years. I sent them off to Leon, whose business is appropriately named Quick Service Brakes. He apologised about being too busy to get to them immediately but still only took just over a fortnight to do them. We discussed what to do about the reservoirs. The two ports in the side of the master cylinders need to be drilled after the sleeve is inserted. This is usually done by drilling right through the side of the reservoir and soldering the hole up afterwards. The alternative is to un-solder the reservoir and put it back on later, but this is labour intensive and adds considerably to the price. We agreed that I'd take the reservoirs off and put them back on myself. This gave me the chance to clean them up and repair them while they were off.
Hexagon top master cylinders - looking a bit better than in the 'before' photo
 I refinished the master cylinders, not by plating but by tinning them with solder. It may sound odd, but all of my research into how to replicate the original dull tarnished light grey finish drew blanks. Everyone I spoke to said something like, "maybe its zinc", or "perhaps its some kind of cad". I consulted a local plater and he said, "I don't know what it is and I can't  replicate it". The breakthrough came when I was heating up the spare one to practice on. As I heated it, little silver beads of molten metal appeared out from under the dull grey finish. Not just on the tin-plate reservoir but from all over the cast iron body as well. I didn't have it hot enough to melt zinc, so It must have been solder. Thinking about it afterwards it does make some sense. Solder typically oxidises to a dull grey white finish over time, and the body would have needed to be tinned in order to solder the reservoir on. After a soak in my derusting bath and a thorough clean, I painted them with Kemtex B916 tinning compound and heated them until it melted. A wipe with a clean cloth and they were looking much better. I just need to work out how to encourage the grey tarnish to re-form quickly now. Soldering the reservoirs back on was a bit tricky but in the end I was pleased with the result. The reservoir from the brake master was pretty bad so I replaced it with one off a spare. As a result its much shinier, whereas the pitted clutch one looks fairly dull. Hopefully they'll even out over time.

New pistons, seals, bleed screws, stainless sleeve - better than new.
I had to solder up one of the original tin master cylinder caps. It doesn't look as good as it might, but I had no choice it was badly corroded and pin-holed in several places. Luckily I managed to get a good nearly new cap on ebay, for the brake master cylinder because the one that was on there crumbles when I undid it.

I figured new clevis were needed after seeing the one that came out
I rebuilt the rear wheel cylinders using new pistons ( a slightly embarrassing story I may reveal one day) and new seals and put the whole lot back together again. The master cylinders went in reasonably easily. I used R clips on the clevis pins which is much easier than messing about with split pins.

It was when I went to bleed them that the problems started. Firstly I discovered that the thread for the bleed screw in the driver's side front whelle cylinder had stripped out. With some tools loaned to me by the local thread repair specialist, I managed to get it working again by drilling and tapping it for a helicoil. It worked OK but weeps a little unless the bleed screw is really tight. I'm either going to have to replace it with a bleed screw insert, or get a new wheel cylinder. Once that was repaired, I discovered a serious leak where the front brake line meets the brake hose on the passenger side. It meant that the radiator had to come out again in order to tighten it up. The tube nut on the end of the brake line has been abused over the years and is rounded off, which makes it nearly impossible to tighten. When I recondition the subframe the brake line will be replaced so it looks like new tube nuts are needed too.

Gunson's Eezibleed hooked up - the black hose gets pressure from the spare tyre.


I eventually got it all bled, I bought a Gunson's Eezibleed, and it was excellent. I bled both the master cylinders on their own first, then connected them up and bled the clutch and brake systems. It was so easy, I could hardly believe it. It took a couple of goes around, firstly before adjusting the brakes, then again afterwards. They'll need adjusting after they've bedded in but are pretty good for now.


I spent the afternoon madly working to get the Traveller running well enough to drive to MiniFest 2011 tomorrow. Big  Mini shows only come around every two years here so they aren't to be missed. I had a few small problems getting it started and running smoothly, but managed to get it to run well enough to risk the trip. It needs a thorough tune up, but should be OK. The brakes are a little spongey still but aren't as bad as I expected. The Traveller is unregistered so I organised a temporary permit which covers me for the duration of the event. Today's road testing was done on my personal test track, of course.